Search for:

RBA THALES (USB) Internet bankarstvo ne radi, programska podrška

Prije svega ukolonite sve aplikacije vezane za RBA internet bankarstvo i resetirajte računalo.

Kliknite na link RBA te pod opcijom Programska podrška unesite SN uređaja 84670840825ED7D2 – Traži. (ćini se kako je ovo univerzalan SN)

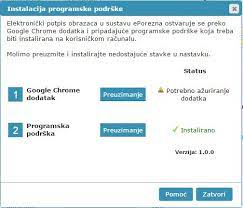
Otvori se popis programa te instalirate program RBA SignErgy i SafeNet.
Nakon instalacije ponovno resetirajte računalo, uključite uređaj te se pokušate ulogirati u internet bankarstvo.

Izvor: rba.hr

  • post je objavljen  kako bi svakodnevno jednostavnije pristupili ovim aplikacijama

Upute za L2TP VPN Windows 10

Upute za L2TP VPN Windows 10

Korak 1

Ovaj korak je bitan jer se VPN server nalazi iza NAT-a

Windows 10 L2TP/IPsec Manual Setup Instructions

Bold items are things you will click or type

To add a necessary registry setting:

  1. Press the Windows Key and R at the same time to bring up the Run box.
  2. Type in: regedit and click OK. Click Yes if asked if you’d like to allow the app to make changes to your PC.
  3. In the left pane, locate and click the folder: HKEY_LOCAL_MACHINE\SYSTEM\CurrentControlSet\Services\PolicyAgent
  4. Click the Edit menu and hover your cursor over New. Click DWORD Value. A new registry will appear in the right pane, named New Value #1.
  5. Rename that file: AssumeUDPEncapsulationContextOnSendRule (this is case-sensitive and contains no spaces) and press ENTER.
  6. Right-click AssumeUDPEncapsulationContextOnSendRule, then click Modify.
  7. In the Value data box, type 2 and click OK.
  8. Reboot the computer.

Korak 2

How To Set Up A VPN In Windows 10 L2TP

Skip to end of metadata

Go to start of metadata

The following steps will help you setup your VPN in Windows 10.

  1.  Click Start then Settings
  • Click Network & Internet
  • Click VPN
  • Click Add a VPN Connection
  • Enter a Name, your VPN address, VPN type (PPTP or L2TP), Username, and Password
  • Click Change adapter options
  • Click the VPN and then Change settings of this connection
  • Click the Security tab
  • Change the following settings:
    • Type of VPN: Layer 2 Tunneling Protocol with IPsec (L2TP/IPSec)
    • Allow these Protocols: Radio button selected
    • Challenge Handshake Authentication Protocol (CHAP): Checked
    • Microsoft CHAP Version 2 (MS-CHAP v2): Checked
  • Click Advanced Settings
  1. Enter Preshare key under “Key”
  2. Click OK
  3. Click OK
  1. Click Connect
  2. You have successfully setup your VPN on Windows 10

Korak 3

VPN connections do not work after Windows 10 May 2019 Update

June 13, 2019 by Paulie 46 Comments

I received the latest Windows 10 update today (May 2019 – Build 1903) and found that none of my existing VPN connections worked. When I try to connect to one of them, it just says “connecting” and eventually stops without producing an error.

I have not found a solution to this, but I have found a very easy workaround. This is by using a tool that has been in Windows Since at least Windows NT 4.0 Called rasphone.exe. I actually prefer the simple interface it provides.

How to get access to your existing VPN connecitons

  • Create a new shortcut on your desktop to:
    C:\Windows\System32\rasphone.exe
Image showing rasphone.exe running on Windows 10 1903 update
  • Double click your new shortcut and you should get this interface:
  • Try your VPN connection.

This will give you access to the traditional dial-up tool which seems to work perfectly. It’s quite clear that something in the update is blocking access to the credentials window appearing and therefore the connection never completes.

It seems strange to workaround an issue with the very latest version of Windows 10 by using a tool that has been around for over 20 years!